Sticky Ribbon Rescue

Sticky Ribbon Rescue

Steps:

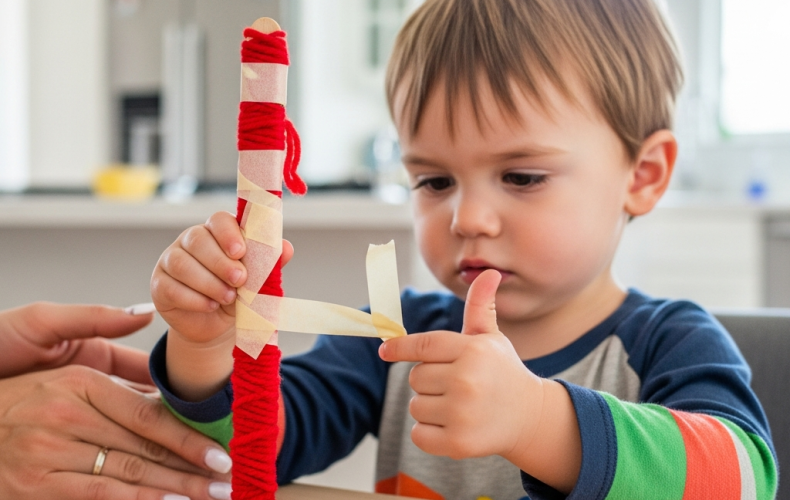
  • Adult Prep: Tightly wrap a piece of Yarn or Ribbon around a Craft Stick. Secure the ends of the yarn with small, strong strips of Masking Tape.
  • Place the finished stick and the empty Container on a stable table.
  • Challenge your child to hold the stick firmly with their helper hand to keep it still.
  • Encourage your child to use their working hand to pinch an edge of the tape. Pull the tape strip off slowly against the resistance.
  • Once the tape is peeled, they can unwrap the yarn and drop the ‘rescued’ ribbon into the Container. Repeat with other prepared sticks!

Safety Tip:
Ribbon, yarn, and small pieces of masking tape are choking hazards for children under three. Constant, direct adult supervision is required throughout this activity. Ensure the child remains seated and materials are not placed near the mouth.

Foil Push Bead Garden

Foil Push Bead Garden

Steps:

  • Place the Aluminium Foil Pan flat on the table. Use markers to draw a few small dots randomly on the pan’s bottom surface. These dots are your targets.
  • Set the pile of Beads and Golf Ball Tees next to the pan in a Plastic Container.
  • Hold the pan firmly with your helper hand. Pick up one Golf Ball Tee using a pincer grasp.
  • Pick up one bead and carefully balance it on the narrow end of the Golf Ball Tee.
  • Aim the tee and bead toward a marker dot. Use a strong, steady push to pierce the foil and drop the bead inside the pan.
  • Repeat this action until all the target dots have a bead successfully ‘planted’ through the foil.

Safety Tip:
Beads and golf tees are small, hard objects. They pose a choking hazard for children under five. Constant and direct adult supervision is required throughout this activity.

Ribbon Slot Stuffing

Ribbon Slot Stuffing

Steps:

  • Adult Prep: Use the Scissors to cut three tight, narrow slots (about 1.5 inches long) into the Cardboard or the lid of the Container. Secure the Cardboard/lid tightly using Masking Tape.
  • Give the child long strips of Ribbon. Encourage them to use both hands to tear the Ribbon into small, stamp-sized pieces. Tearing wakes up the hand muscles!
  • Ask your child to hold the container steady with their helper hand (proximal stability) while it sits on the table.
  • Pick up one torn Ribbon piece. Crumple it tightly into a small ball using only their fingertips (working on pincer grasp and in-hand manipulation).
  • Aim the crumpled ribbon ball at a slot. Use a controlled, firm push with the index finger or thumb to send the ribbon piece completely inside the container. Repeat until the container is full!

Safety Tip:
Ribbon pieces are small objects. Constant and direct adult supervision is required throughout the activity, as they pose a choking hazard for children under five.

Resistant Rip Mural

Resistant Rip Mural

Steps:

  • Secure a large sheet of cardboard vertically onto a wall or door using masking tape.
  • Place several long strips of masking tape horizontally across the cardboard, sticky side OUT, creating several large, sticky ‘target zones’ or frames.
  • Give your child a large, flat piece of thick cardboard.
  • Challenge your child to use both hands to tear the thick cardboard into small, jagged pieces (this requires strong effort!).
  • Encourage them to pick up one torn piece and firmly press it onto the vertical sticky target, filling the frames to create a textured mural.

Safety Tip:
Ensure the vertical cardboard surface is stable and cannot fall or slide during the activity. Always supervise young children to ensure they do not attempt to ingest torn cardboard or masking tape pieces.

Felt Resistance Wall

Felt Resistance Wall

Steps:

  • Adult Prep: Cut a sturdy rectangle from the cardboard. Cut 5 to 6 narrow strips of felt, about 1 inch wide.
  • Help your child glue the felt strips vertically onto the cardboard. Leave a very narrow gap between each felt strip to create resistant channels.
  • Once the glue is completely dry, have your child hold the cardboard firmly with their helper hand to keep the wall steady.
  • Challenge your child to pick up a craft stick. Push the stick straight through one of the narrow felt channels. This requires controlled force.
  • Continue inserting all the sticks into the wall, working to keep the cardboard from tipping or moving during the push.
  • When finished, gently pull the sticks out (working those muscles again!) and repeat the building process.

Safety Tip:
Maintain constant adult supervision, especially during the preparation phase involving scissors and glue. Ensure the child pushes the sticks away from their face and body to prevent accidental poking.